
The IP address 192.168.1.1 is well known in the Internet world for allowing us, among other things, to access the router's configuration. Thanks to this, we can change parameters of our connection such as the name of the WiFi, the password and the number of open ports. We can also see the amount of equipment connected to the router in question to see if there are devices outside our environment taking advantage of our connection. Today we will teach you to access that address through the browser and change some of the parameters that we have just mentioned to configure the network to our liking.
How to enter 192.168.1.1 to view the router configuration
Entering the router configuration is extremely simple. Generally we can access by typing the following address in the browser:
- //192.168.1.1
In the event that no results appear, we can access through the following IP addresses:
- 192.168.0.1
- 192.168.0.0
- 192.168.1.0
If by any chance the browser still does not show us any results, we recommend you take a look at this other guide where we teach how to access from any router, whether it is from Movistar, Lowi, Orange, Jazztel, Vodafone or any other company.
Otherwise, the next thing to do is enter the username and password to enter the router configuration. Generally, this is usually located on the router sticker itself , as we can see in the image below.
If our router is something old, the safest thing is that we can access it through a generic password .
We leave you below with a list of the most common users and passwords:
- admin and admin
- 1234 and 1234
- 12345 and 12345
- 0000 and 0000
- 00000 and 00000
- user and user
- admin1234 and admin1234
Basic router configuration at 192.168.1.1
Once inside the router configuration, the interface that will appear will be similar to one of the following:
192.168.1.1 from Movistar

192.168.1.1 from Orange

192.168.1.1 from Vodafone and ONO

192.168.1.1 from Lowi
192.168.1.1 from Jazztel

How to change the name of the WiFi network in 192.168.1.1

If we have already familiarized ourselves with the configuration of the router, changing the name of the WiFi will not take us more than two minutes.
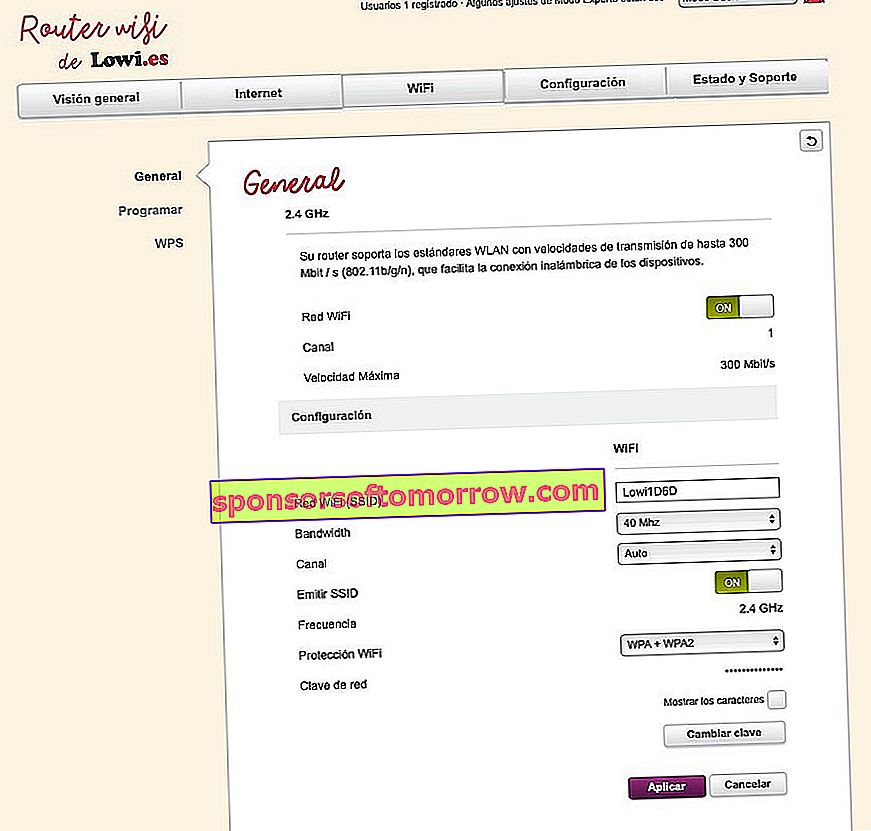
To do this, we will have to access the General, Wireless, WiFi or Advanced section , depending on our router model. In our case, having a Lowi Technicolor router, we will select the WiFi section and then the General section.
Once inside this, all we have to do is go to WiFi Network (SSID) and change the name of the WiFi to the desired one .
Finally we will give Save and now yes, the WiFi will be saved with the new name. To access it from any of the devices that we have connected (mobile, tablet, PC) we will have to enter the password again as it is a new network .
How to change the password of the WiFi network in 192.168.1.1

If we prefer to change the password instead of the name to increase security, the process is just as simple as the previous one. After all, this setting is usually found in the same place as the WiFi SSID .
In our case, we will access the WiFi and General section again to change the WiFi password. The option that interests us this time is to Change password (or Network password / WiFi Password) .
As simple as writing a new one and hitting the Apply button. Generally, we will have to enter the old password to change it for a new one , which is why we recommend having it handy.
How to see the WiFi password in 192.168.1.1

In addition to being able to change the password, the router's configuration panel also allows us to see it.
In this case, we will again have to go to the WiFi and General settings .
Once inside, we will go to Network key and click on Show characters . This setting is not activated in all router models, so it will depend on our company that we have contracted and its configuration panel.
How to find out who is connected to my router or WiFi and disconnect it at 192.168.1.1

Surely one of the most useful functions offered by the router's configuration panel. The downside is that this option is not activated in all companies, which is why we are forced to resort to applications to see who is connected to WiFi.
If this is not our case, seeing the equipment that is connected to our network is as simple as going to the General or Overview section, depending on our router model. Then, all the devices connected by WiFi, Ethernet and USB will be shown with their respective MAC addresses.
Have we detected an intruder on our network? Then the best thing is to change the name and password of the WiFi network . We can also filter by MAC addresses to prevent any other device from connecting to the router.
How to do MAC filtering on 192.168.1.1 to prevent others from connecting

The so-called "MAC filtering" is one of the main methods to improve the security of our router's WiFi. Thanks to this, we can block all access from devices that are not registered in the router's MAC address list . The good thing is that practically all routers implement this option as standard, although for this we will have to access the advanced settings.
In our case, we will have to activate the Expert Mode to perform the filtering correctly (in the upper bar we can change from Basic to Expert). If we have a different router model, the option can be found in Advanced under the name of MAC Filtering .
When we are in the section in question, we will activate the MAC Filtering option and we will add all the MAC addresses of the devices that have already been connected to the network previously. We can see a list of all of them following the previous method, although generally the panel will recognize the devices already registered.
Once we have finished adding all of them, we will click Apply. From now on, we will have to add the MAC address of each new mobile, computer or tablet manually to said table to connect them to the WiFi network.
How to open the ports on the router at 192.168.1.1

Opening the router ports is another security measure that, together with MAC filtering, helps make our WiFi network impenetrable. The main objective of opening and closing the ports of a router is neither more nor less than to assign a series of fixed IPs to a set of computers, mobiles or tablets through MAC addresses. Of course, we must also change the IP on the target device so that it connects to the Internet correctly.
On most routers, opening the ports is as simple as going to advanced settings and configuring DHCP. In others, as is our case, the setting has the name of Port forwarding , and it is found in the Internet section.
Once inside, we will only have to add a new redirect. At this point, we will fill in all the data of our device (MAC address, name ...) and we will assign a fixed IP , which must coincide with the IP that we have previously assigned from the computer or mobile. The rest of the section we will fill in to our liking depending on the number of ports that we want to open.